Deploy a Custom Marketplace Application
Estimated reading time: 4 minutes
You can create custom marketplaces, in addition to the Default Marketplace. Then, you can add Docker container-based applications to custom marketplaces. These instructions illustrate how to add the Python Web Server application to a custom marketplace.This example uses public GitHub and Docker repositories.
The following steps describe how to deploy marketplace applications that are not a part of the default marketplace repository:
See also:
Prerequisites
- Docker Experience
- GitHub Experience
Create a Docker Image
You must configure Docker and Github before you can configure a custom marketplace in OT Link Platform.
- Create a project directory named python-webserver under the “~/” directory.
-
Create a Dockerfile with the following content:
FROM ubuntu RUN apt-get update RUN apt-get -y install python RUN apt-get clean EXPOSE 8000 CMD [ "python", "-m", "SimpleHTTPServer" ] - Build the Docker image:
$ ~/python-webserver> docker build -t python-webserver . - Create a Docker repository in Docker Hub (https://hub.docker.com) with the name:
<your username>/python-webserver -
Push the python-webserver image to the Docker Hub:
$ ~/python-webserver> docker login —-username=yourhubusername
$ ~/python-webserver> docker tag python-webserver <your username>/python-webserver
$ ~/python-webserver> docker push <your username>/python-webserver
Create a Marketplace Catalog in GitHub
GitHub serves as the filesystem for this git-based marketplace. Take the following steps in GitHub, in preparation for configuring a custom marketplace in OT Link Platform.
- Log in to your github.com account.
- Create a git repository with the name: demo-marketplace.
- Pull the git repository to your local computer:
~/demo-marketplace - Create a templates folder under:
~/demo-marketplace - Create a python-webserver folder under:
~/demo-marketplace/templates - Create a readme.mdfile to describe the application under:
~/demo-marketplace/templates - Create a config.yml file under:
~/demo-marketplace/templates/python-webserver -
Add the following content to the config.yml file:
name: PythonWebServer description: Simple Web Server with Python category: Programming version: 2.7 - Choose your own image (in PNG format) to use as a thumbnail for this application and use
catalogIcon-as a prefix for the filename.
The full filename looks like this:catalogIcon-python-webserver.png - Save this image file under:
~/demo-marketplace/templates/python-webserver - Create a 0 (zero)folder under:
~/demo-marketplace/templates/python-webserverThis folder enables installation script versioning. Other installation version scripts, such as 1,2, and 3, can be created. - Create a readme.md file to describe the application under:
~/demo-marketplace/templates/python-webserver/0
Example readme content:
```
# Python WebServer
This template creates a simple webserver using Python

## Usage
Choose the HTTP port you want to expose, for example `8000`
```
- Create a docker-compose.yml file under:
~/demo-marketplace/templates/python-webserver/0
Example content:
```
webserver:
  image: <your dockerhub <username>/python-webserver:latest
  ports:
    - ${HTTP_PORT}:8000
```
- Create a loop-compose.yml file under:
~/demo-marketplace/templates/python-webserver/0
This `loop-compose.yml` file provides the variable descriptor for the `docker-compose.yml` file.

```
.catalog:
  name: Python-WebServer
  version: latest
  uuid: python-webserver—0
  questions:
  - variable: HTTP_PORT
    description: 'WebServer exposed port'
    label: 'Port:'
    required: true
    default: 8000
    type: int
```
- Push all files to the git repository.
```
$ ~/demo-marketplace> git add .
$ ~/demo-marketplace> git commit -m "add python webserver"
$ ~/demo-marketplace> git push -u origin master
```
Add a Docker Registry
To enable retrieval of applications from Docker containers, you first must give OT Link Platform access to the repository.
- In OT Link Platform, go to Applications > Registry.
- Enter the registry name, address, and credentials. Then, click Add.

Add a Custom Marketplace
In addition to the Default Marketplace, users can define their own public or private marketplaces. Typically, service providers and partners take advantage of this feature to deploy applications for their clients. Users can add multiple marketplaces and each marketplace can have multiple applications. The number of applications is limited only by the hardware size.
- Go to Applications > Configure.
-
Click
 to add a custom marketplace.
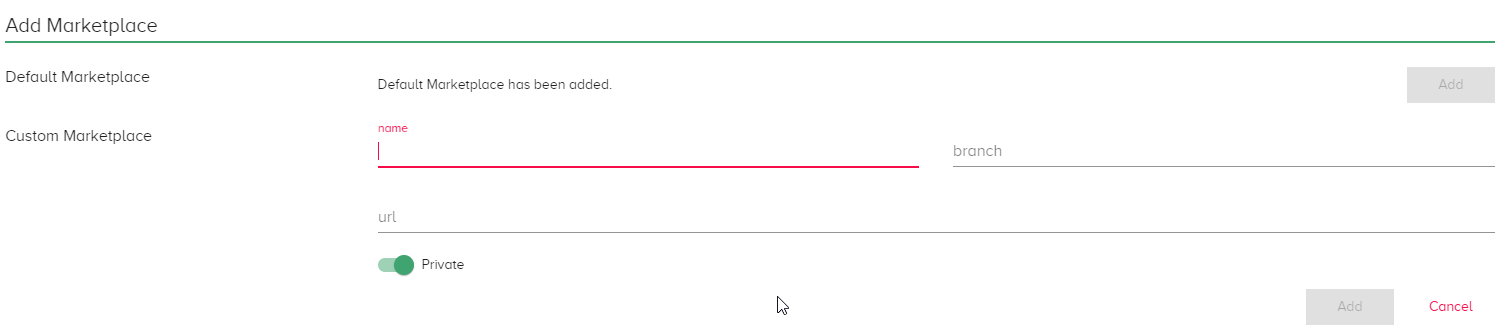
- Enter a name,the relevant branch, and the Docker registry URL. For this example, use:
- Name: demo-marketplace
- Branch: master
- URL:
/demo-marketplace
- Select a public or private marketplace. Then, click Add.
OT Link Platform will retrieve applications from this location and add the applications to the marketplace. This process may take some time because application data is retrieved over the network.
Once the marketplace is added, it will appear in the Marketplace List: Applications > Marketplace.
