Flow to Write to and Read a File
Estimated reading time: 4 minutes
Use these procedures to create a log file on the OT Link Platform device, populate it, and then read its contents. These instructions provide an example of how to use flows to write to and read data from files.
Tips:
- Use the filter nodes searchfunction in the node palette to find specific nodes, such as a file node.
- As you modify flow configurations, be sure to save the flows. Otherwise, the nodes will exist only in the flow editor and the revised flows will not be executable.
- Filenames used in node configurations are case sensitive.
Create a Log File
A file must first be created before data can be written to it.
To create a file in a flow:
- In the navigation panel, select Flows.
- In the Flows window, click Go to Flows.
- Click the + at the upper right of the canvas to start a new flow.
-
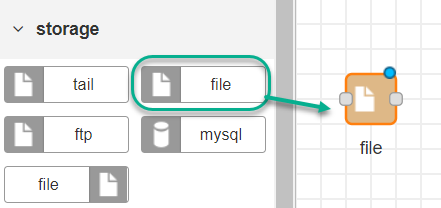
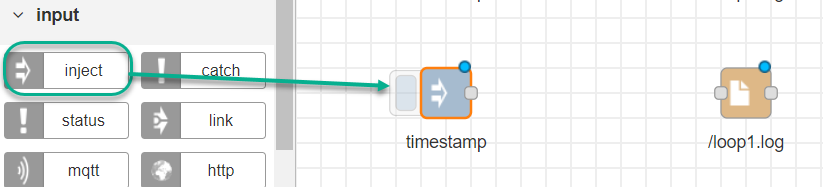
Drag a file (write) node onto the canvas.
This node can be found under storage in the palette. Note that there are two file nodes: a file in node to read and a file node to write.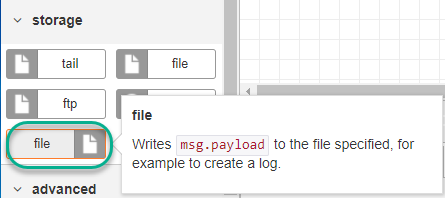
-
Double-click the file node and enter a filename prefaced with a forward slash ( / ).
The forward slash is required in the filename. For example:
/loop1.log
The file will be created on the OT Link Platform device. If a subdirectory already exists, you can supply the full path to the file. For example:/logfiles/loop1.log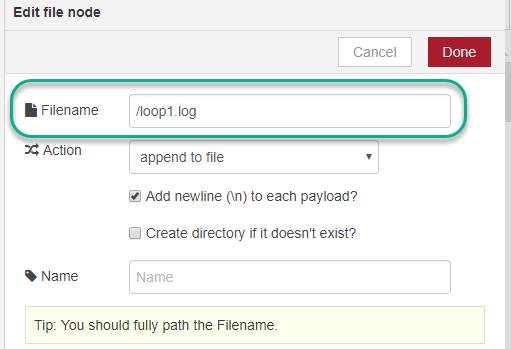
- Select an Action of append to file and click Done.
-
Drag an inject node onto the canvas.
This node can be found under input in the palette. Note that it defaults to timestamp. This node serves as a trigger to create the file. Other payload options are available, but they will be covered later in advanced flow examples.
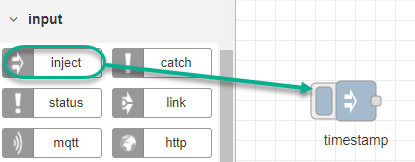
- Wire the inject node to the file node.
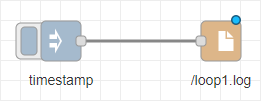
-
Click Save, at the top right of the canvas, to save the flow.
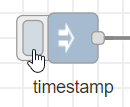
If there is an issue with the save action, an error message will be displayed in the debug tab area below the canvas. If the file creation is successful, no messages will be shown in the debug tab. - Click the button to the left of the inject (timestamp) node to inject the timestamp, which creates the file locally. In this example, the
/loop1.logfile is saved.
A common error in this scenario is the omission of the forward slash in the filename. The forward slash is required.
- Go to Read a File for the instructions to verify that the file was created.
Write to a File
In the steps listed in Create a Log File, the inject node was used to trigger the creation of the file. The following steps illustrate a basic example of writing to a file.
To continue writing to the file that was created in Create a Log File:
- Click the button to the left of the inject (timestamp) node to inject the timestamp, which inserts the timestamp into the file.
- Go to the steps in Read a File to verify that the write was succesful.
- Continue to click the inject button to write additional timestamps to the file.
Write a Message to the File
To illustrate yet another way to populate a file from a flow, try these steps to inject a string into the flow:
- In your write flow, double-click the inject mode to change the payload to string,enter text, and click Done. In this example, we have entered:
Hello World.
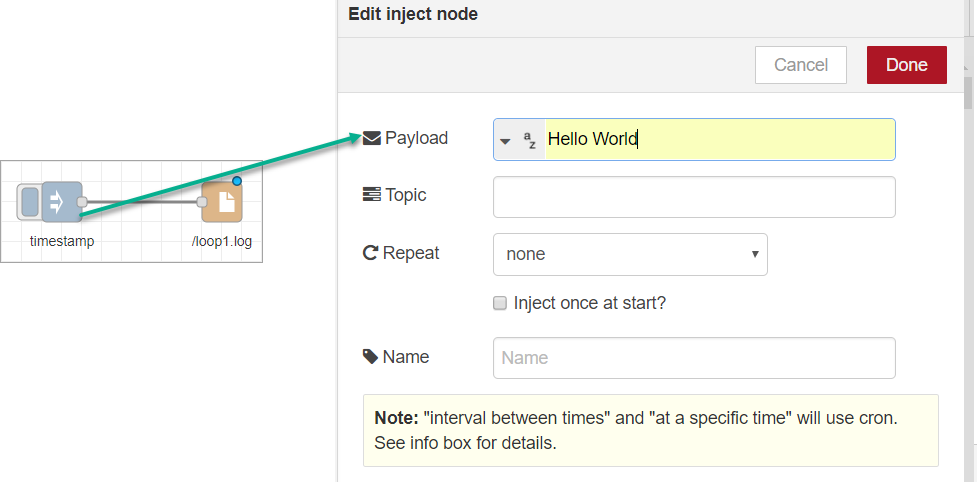
- Click Save at the top right of the canvas.
- Click the button to the left of the inject node to inject the message (payload) into the flow.
-
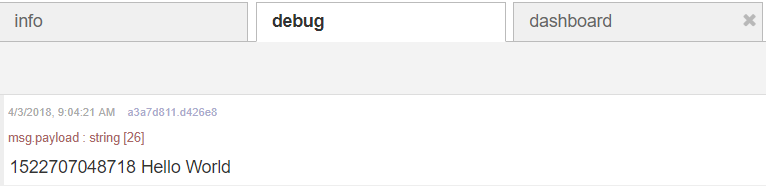
Go to Read a File for the instructions to verify that the message was written to the file. In this example, the debug area will display the timestamp from the previous steps and the inserted message.
Read a File
To read the file that was created in Create a Log File and written to in Write to a File, take these steps:
-
Drag the file in node onto the canvas.
-
Double-click the node, enter the filename, and click Done.
The output will be in the standard utf8 string format.The forward slash is required in the filename. For example:
/loop1.log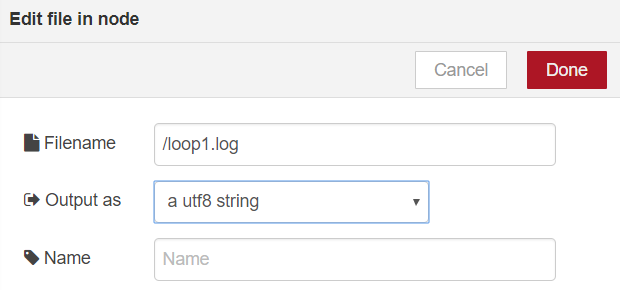
-
Drag an inject node onto the canvas, to the left of the file in node.
- Drag a debug node onto the canvas, to the right of the file in node.
-
Connect the inject node and the debug node to the file in node.

- Click Save at the top right of the canvas.
- At the bottom of the canvas, click the debug tab.
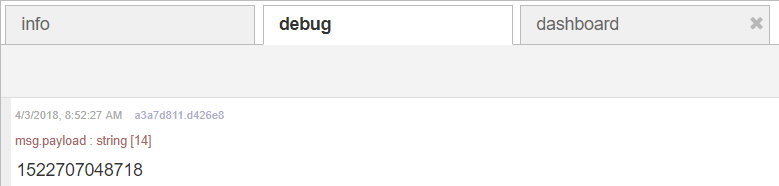
- Click the button to the left of the inject (timestamp) node to trigger the flow.
The debug area shows the timestamp (payload) that has been written to the/loop1.logfile.