Send Bulk Data from a file to a Database
Estimated reading time: 6 minutes
This page describes how to send data from a file to a database app from the OT Link Platform Marketplace. This flow will show how to execute a bulk insert SQL operation using data from the file, and remove the file from the system after the data is inserted into the database.
Prerequisites:
- Set up a database app in OT Link Platform Marketplace.
- Add a Cloud Connector Topic to the OT Link Platform DataHub.
- Check Database Connectivity.
- Familiarity with SQL queries.
Add a Flow to Write Data from a File to a Database
-
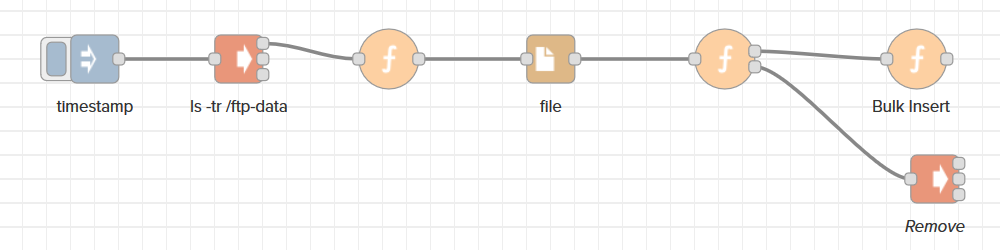
Add an Inject node, two exec nodes, three Function nodes, and a File In node. Connect them as they are pictured below:
-
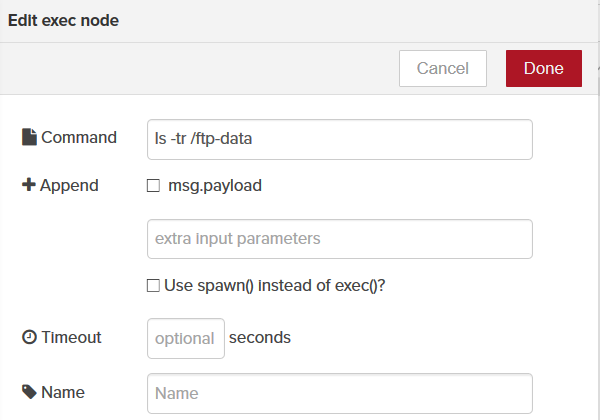
Double-click the first exec node and enter the following command:
ls -tr /ftp-dataThe ls command will list files in the /ftp-data/ folder that we wrote a file to earlier. The -tr option will list files by time last modified, with the latest file at the end of the list.
-
Double-click the first Function node and write the following lines of code:
var temp = (msg.payload).split("\n"); // Saves a temporary list of filenames. temp.pop(); // Remove an extra line from the split command in the previous line. msg.filename = "/ftp-data/" temp[0]; // Sets the file to read from to be the one that we saved previously. return msg; -
Click Done. Double-click the second Function node and write the following lines:
var msg1 = { payload:msg.payload }; // Sets the first Function node return value as the message text, the contents of the input file. var msg2 = { payload:msg.filename }; // Sets the second return value as the filename we are reading from. delete msg.payload; // Deletes the msg.payload object from memory since we copied it and no longer need it. delete msg.filename; // Deletes the msg.filename object from memory. return [msg1,msg2]; // Returns msg1 in the first flow output, and msg2 in the second flow output. -
Click Done. Double-click the final function node and copy the following lines:
At a minimum, you must change the sql, user, password, connStr variables to match your database. Optionally, you can change the table name and column names. The code below marks lines as Required or Optional to change.
var temp = msg.payload; var arr = temp.split("\n"); arr.pop(); // Removes unnecessary extra line from the file. var sql = global.get('mssql'); // Required. var user = 'sa'; // Required var password = 'yourStrong(!)Password'; // Required. var connStr = `mssql://${user}:${password}@192.168.9.19:1433/plcdata`; //Required. /* Optionally change table/column names to your own.*/ sql.connect(connStr) .then(() => { var table = new sql.Table('alldata'); // Optional, replace alldata with the table name you like. table.create = false; table.columns.add('plctimestamp', sql.VarChar(255), { nullable: true }); // Optional, replace plctimestamp with the column name that you want. table.columns.add('tag', sql.VarChar(255), { nullable: true }); // Optional, replace tag with the column name that you want. table.columns.add('value', sql.VarChar(255), { nullable: true }); // Optional, replace value with the column name that you want. for (let i = 0; i < arr.length; i ) { // Loops through each line of the input file. var q = JSON.parse(arr[i]); // Stores a line of the input file into a variable. table.rows.add("" q.timestamp "", q.tagName, "" q.value ""); // Takes the timestamp, tagname, and value from the line in the input file to insert into the database table. } var request = new sql.Request(); // Creates a new SQL request object. return request.bulk(table); // Inserts the table and rows into the database through the SQL request object. }) .then(data => { // If the insert operation was successful, we will return the result in msg for debug purposes. msg.payload = data; return msg; }) .catch(err => { // If the insert operation had an error, we will return in the error in a msg for debug purposes. msg.payload = err; return msg; }); -
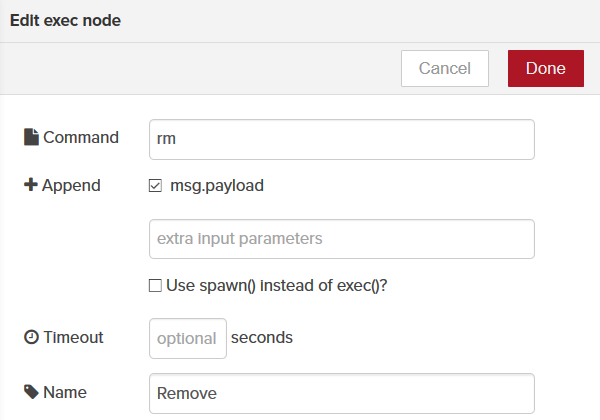
Click Done. Double-click the final exec node and write rm as the command to delete the file that we wrote to the database and no longer need:
-
Make sure to check _msg.payload_next to Append. Click Done.
Complete Flow
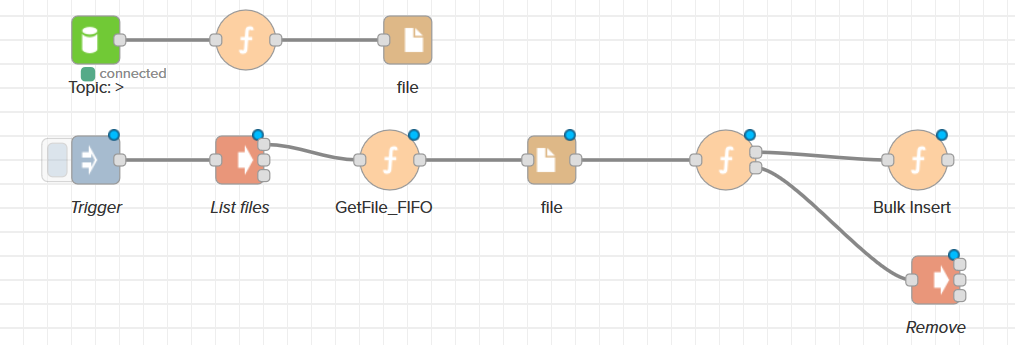
If you followed the steps described in the Write Bulk Data From All Topics to a File page, you already have a set of nodes that create a file and write data to it. This page describes the steps for writing data from a file to the database. Combining the two flows completes the full steps from setting up the data file to insert, to inserting the data from the file into the database.
The final flow will look something like the below screenshot if you follow the steps from this page and the Write Bulk Data From All Topics to a File page: