System battery replacement
If the server no longer automatically displays the correct date and time, then replace the battery that provides power to the real-time clock. Under normal use, battery life is 5 to 10 years.
WARNING: The computer contains an internal lithium manganese dioxide, a vanadium pentoxide, or an alkaline battery pack. A risk of fire and burns exists if the battery pack is not properly handled. To reduce the risk of personal injury:
- Do not attempt to recharge the battery.
- Do not expose the battery to temperatures higher than 60°C (140°F).
- Do not disassemble, crush, puncture, short external contacts, or dispose of in fire or water.
- Replace only with the spare designated for this product.
To remove the component:
- Do one of the following:
- For tower models, open and remove the tower bezel.
- For rack models, if installed, remove the security bezel.
- Power down the server.
- Remove all power:
- Disconnect each power cord from the power source.
- Disconnect each power cord from the server .
- Do one of the following:
- For tower models, place the server on a flat, level surface with the access panel facing up.
- For rack models, extend the server from the rack.
- Remove the access panel.
- Remove the fan cage.
- Locate the battery on the system board.
- If the system battery is secured by a metal tab, do the following:
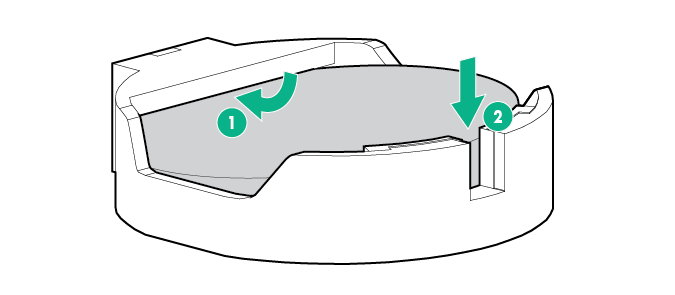
- If the system battery is secured by a plastic outer clip, do the following:
- Use a small flat-bladed, nonconductive tool to carefully lift the front of the battery from the socket.
- Remove the battery.
 IMPORTANT: Replacing the system board battery resets the system ROM to its default configuration. After replacing the battery, use BIOS/Platform Configuration (RBSU) in the UEFI System Utilities to reconfigure the system.

To install the component:
- If the battery socket design uses a metal tab to secure the battery, insert the battery with the "+" side facing up on the socket, and then press the battery down to secure it in place.

- If the battery socket design has a plastic outer lip to secure the battery, insert the battery with the "+" side facing up underneath the outer lip of the socket, and then press the battery down to secure it in place.
- Install the access panel.
- Do one of the following:
- If the server is in a tower configuration, return the server to an upright position.
- If the server is in a rack configuration, slide the server into the rack.
- Connect each power cord to the server .
- Connect each power cord to the power source.
- Power up the server.
- Do one of the following:
- For tower models, install the tower bezel.
- For rack models, install the security bezel.
For more information about battery replacement or proper disposal, contact an authorized reseller or an authorized service provider.