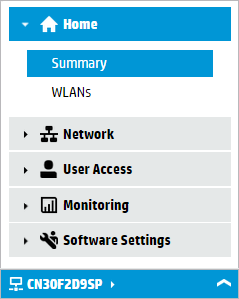
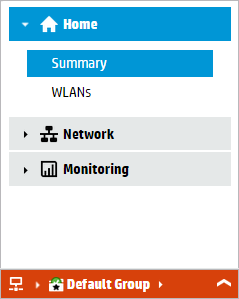
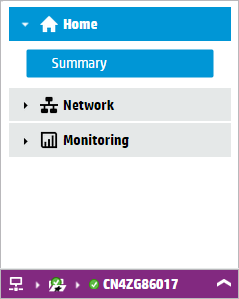
The main menu appears on the left side of the Simplified UI workspace. The options you see on the main menu change depending on whether you are viewing a controller, AP group, or individual AP. The network tree (at the bottom of the main menu), changes color to indicate which type of device you are viewing: blue for the controller, orange for groups, and purple for APs.
| Main menu when viewing the controller. The network tree is blue. |
Main menu when viewing an AP group. The network tree is orange. |
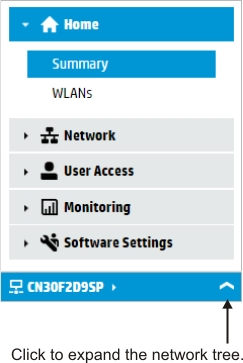
Main menu when viewing an AP. The network tree is purple. |
 |
 |
 |
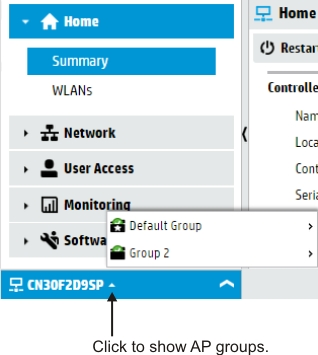
To switch between devices, use the network tree. Click the small arrow to the right of the controller name to see a list of AP groups. For example:
Next, select a group to open it. In this example, the Default Group was selected. The network tree changes to orange and displays the group name.
The same can be done to see the APs in a group. Click the small arrow to the right of the group name. For example:
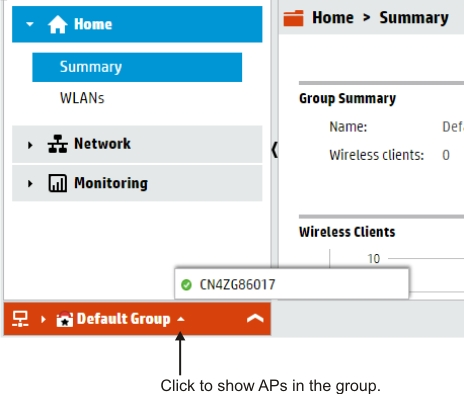
Next, select an AP to open it. In this example, the AP CN4ZG86017 was selected in the Default Group. The network tree changes to purple and displays the AP name.
To see all the groups and APs being managed by the controller, expand in the network tree by clicking the large arrow to the far right of the controller name.
The network tree opens showing all groups defined on the controller. Expand a group to see the APs assigned to the group. In the following example, the Default Group has one AP assigned to it.

-
Click Edit to open the group editor. You will see a list of all groups and APs. For example:

Use the action buttons to manage the groups and APs.
-
Add Group: Adds a new group to the controller.
-
Move To: Moves the selected AP to a different group. Moving an AP to a different group causes it to be restarted.
-
Rename: Renames the selected AP or group.
-
Delete: Deletes the selected AP or group. A deleted AP may automatically rediscover the controller if the AP is left connected to the network. Therefore, before deleting an AP, disconnect the AP unless you want it to rediscover the controller.
-
-
Use the Filter to show only those groups or APs that match the text you enter into the filter box. The filter is not case sensitive and spaces are ignored. For example, filtering on MTL matches MTL12 and Mtl Office. If multiple filter terms are specified, then the results contain all matches regardless of their order. For example, the filter MTL off matches MTL Office and OFFICEMTL.
The filter searches the following group and AP properties for matches:
-
Groups: Name
-
APs: Name, IP address, MAC address, DNS name, serial number
-
-
Use the Toggle View button
 to change how APs are displayed: either below the group name or to the right side.
 -
Use the Pin button
 to change how the network tree behaves when you select a group or AP. When the network tree is pinned, the network tree stays open when you select a group or AP. When the network tree is not pinned, the network tree collapses whenever you select a group or AP.