| Brocade 16Gb Fibre Channel SAN Switch Module for HPE Synergy
| |
| Brocade 16Gb Fibre Channel SAN Switch Module for HPE Synergy
| |
The Brocade 16Gb FC Switch Module does not require any regular physical maintenance.
It is critical, however, that environmental conditions, described in Environmental requirements, are met to help prevent switch failure due to heat stress or improper air flow.
The Brocade 16Gb FC Switch Module comes with dust covers installed on all SFP/QSP ports, and should remain inserted in ports where SFPs/QSFPs are not installed. Having dust covers installed in empty ports ensures proper air flow and helps reduce dust contamination.
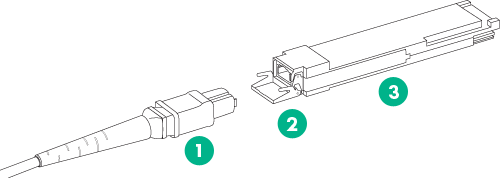
To remove a QSFP transceiver:
Remove the cable from the transceiver.
Rotate the bail down, and then use the bail to pull the transceiver out of the blade connector.
To install a QSFP transceiver:
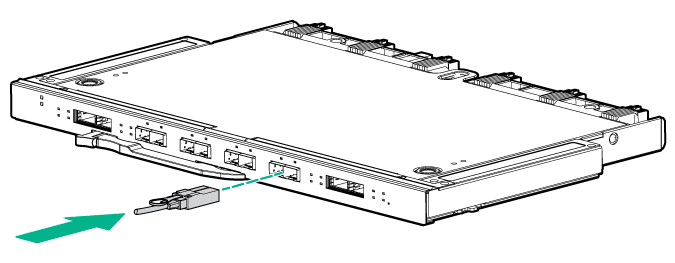
While holding the bail, position the QSFP transceiver to align with the blade connector and push in the transceiver until it is firmly seated.
The status LED initially blinks amber, and then displays steady amber. The QSFP transceiver is keyed to fit into the connector only one way.
Close the bail.
Attach the cable.
In some cases, you might need to reinstall an SFP transceiver.
To remove an SFP transceiver:
Press and hold the cable release.
Remove the cable from the transceiver.
Pull the pull tab or bail (wire handle or plastic tab) to release the transceiver.
Grasp the pull tab or bail, and gently but firmly pull the transceiver out of the port.
Repeat this procedure for the remaining ports as required.
To install a replacement SFP:
For SFPs with bails, make sure the bail is in the unlocked position.
Orient the SFP with the appropriate port (see Installing an SFP).
Insert the SFP into the port until it clicks.
Close the bail if it is the wire handle.
In addition to POST, Fabric OS includes diagnostic tests to help troubleshoot the hardware and the firmware, including tests of internal connections and circuitry, fixed media, and the transceivers and cables in use.
Initiate diagnostic tests with the command line, using a Telnet session or a serial connection to the switch via OneView. Some tests require the ports to be connected by external cables to allow diagnostics to verify the serializer/deserializer interface, transceiver, and cable. For information on available diagnostic tests, enter diagHelp or portcfgdport.
All diagnostic tests are run at link speeds of 4 Gbps, 8 Gbps, and 16 Gbps.
CAUTION: Diagnostic tests can temporarily lock the transmit/receive link speed during diagnostic testing. | |
For information about specific diagnostic tests, see the latest version of the Fabric OS Administrator Guide, or enter help followed by the name of the diagnostic test.