CAUTION: Installing a high-performance heatsink requires the installation of a processor assembly onto the heatsink. To avoid damage to server or components, do not remove or install the processor assembly when installing or replacing other heatsinks.
To determine when a high-performance heatsink should be installed in the
server, see the
server QuickSpecs on the Hewlett Packard Enterprise website (http://www.hpe.com/info/qs).
Before installing this option, be sure that you have the following:
The components included with the hardware option kit
T-30 Torx screwdriver
1/4" flat blade screwdriver or nonconductive tool
Hewlett Packard Enterprise recommends using a nonconductive tool.
Procedure
Observe the following alerts.
CAUTION: The processor assembly must be removed and replaced as a unit. Do not remove the processor from the carrier.
CAUTION: When handling the heatsink, always hold it along the top and bottom of the fins. Holding it from the sides can damage the fins.
CAUTION: THE CONTACTS ARE VERY FRAGILE AND EASILY DAMAGED.
To avoid damage to the socket or processor, do not touch the contacts.
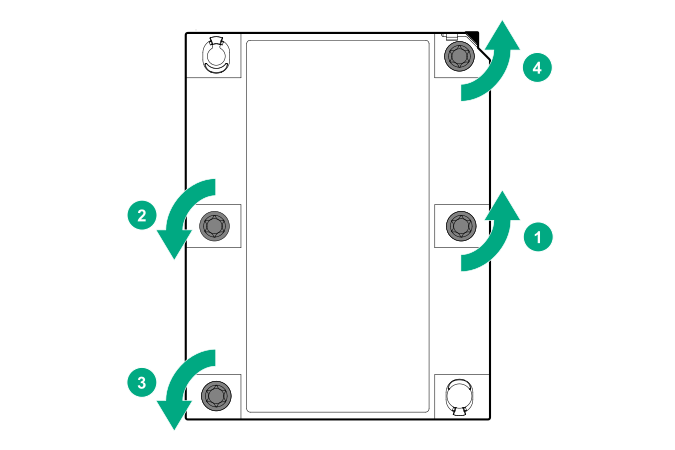
CAUTION: Be sure to loosen each heatsink nut in the order indicated. Otherwise, damage might occur to the heatsink or processor.
CAUTION: Install the processor heatsink assembly as soon as possible after removing it. Do not leave the processor socket unpopulated for extended periods of time.
Remove the existing processor heatsink assembly:
Allow the heatsink to cool.
Using a T-30 Torx screwdriver, loosen the heatsink nuts.
Lift the processor heatsink assembly up and away from the system board.
Turn the processor heatsink assembly over and place it on a work surface with the processor assembly facing up.
Release the thermal grease adhesion between the processor assembly and heatsink:
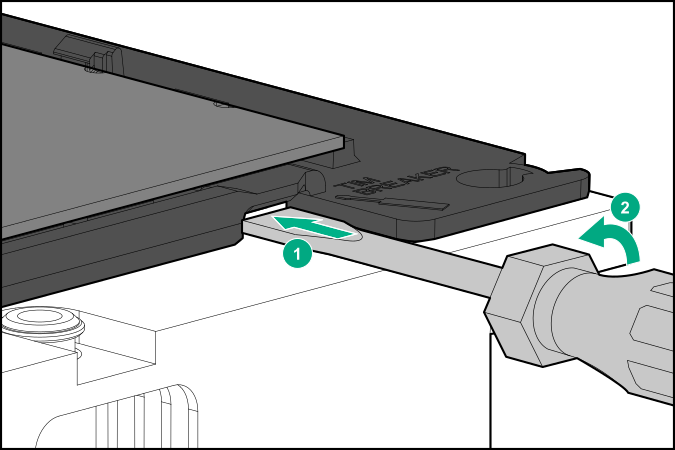
Locate the TIM (thermal interface media) breaker slot between the processor assembly and heatsink.
The slot is across from the Pin 1 indicator, near the corner.
Insert a 1/4" flat blade screwdriver or nonconductive tool into the slot.
CAUTION: To avoid damage to the processor, insert the tool between the processor and the heatsink base. The opening in the carrier provides access to a gap between the processor heatsink spreader and the heatsink base.
To release the adhesion of the thermal grease, gently rotate the tool.
Unlatch the remaining corners of the processor assembly.
Separate the processor assembly from the heatsink.
The processor remains attached to the carrier.
Using an alcohol wipe, remove the existing thermal grease from the processor and heatsink. Allow the alcohol to evaporate before continuing.
Remove the plastic cover over the thermal grease on the high-performance heatsink.
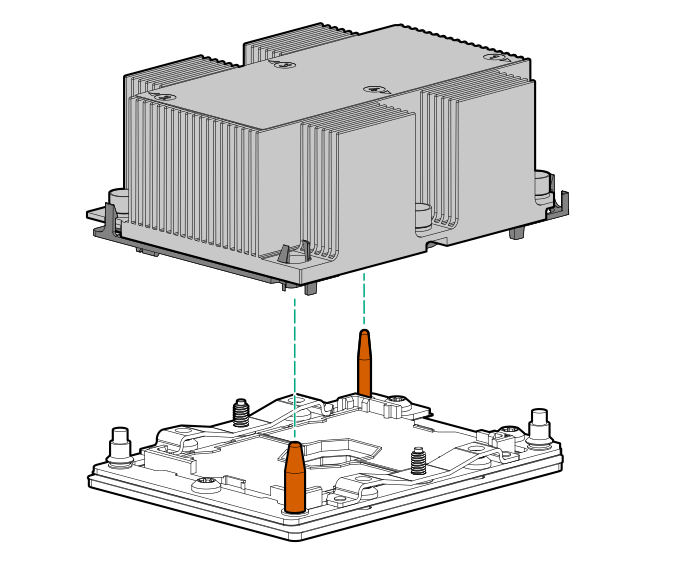
Install the processor assembly on the heatsink.
Align the Pin 1 indicator on the processor to the Pin 1 indicator on the heatsink, and then latch the processor assembly to the heatsink.
Your heatsink may look different than the one shown.
Install the processor heatsink assembly:
Locate the Pin 1 indicator on the processor carrier and the socket.
Align the processor heatsink assembly with the heatsink alignment pins and gently lower it down until it sits evenly on the socket.
The heatsink alignment pins are keyed. The processor heatsink assembly will only install one way.
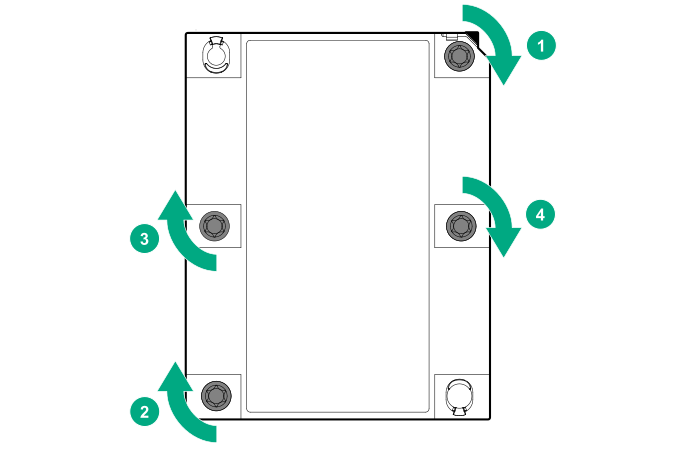
CAUTION: Be sure to tighten each heatsink nut fully in the order indicated. Otherwise, boot failure or intermittent shutdowns might occur.
Using a T-30 Torx screwdriver, fully tighten each heatsink nut until it no longer turns.