Install the chassis into the rack
- Observe local occupational health and safety requirements and guidelines for manual material handling.
- Remove all installed components from the chassis before installing or moving the chassis.
- Use caution and get help to lift and stabilize the chassis during installation or removal, especially when the chassis is not fastened to the rack.
- You must fully understand the static and dynamic load carrying capacity of the rack and be sure that it can accommodate the weight of the chassis.
- Be sure sufficient clearance exists for cabling, installation and removal of the chassis, and actuation of the rack doors.
The chassis requires rails for installation in a rack. To install the rack rails, see the HPE Apollo 4500 4U Rail Installation Instructions that ship with the rack hardware kit.
You can install up to nine chassis in a 36U, 1200mm deep rack. If you are installing more than one chassis, install the first chassis in the bottom of the rack, and then install additional chassis by moving up the rack with each subsequent chassis. Plan the rack installation carefully because it is difficult to change the location of components after they are installed.
- The rack is bolted to the floor using the concrete anchor kit.
- The leveling feet extend to the floor.
- The full weight of the rack rests on the leveling feet.
- The racks are coupled together in multiple rack installations.
- Only one component is extended at a time. If more than one component is extended, a rack might become unstable.
-
Align and install the right and left rails into the rack.

-
Align and install the support brackets on the rear of the rack.
The R and L on the brackets indicate the location when standing at the rear of the rack.

-
Install a cage nut into the rack on each side in the top hole at 3U above the bottom of the rail.

-
If you are installing the chassis manually, install the chassis lift handles:
Align the chassis lift handles with the tick marks on the side of the chassis.
Tick marks are provided on the side of the chassis to assist with aligning the handles for installation.
Install both chassis lift handles on either side of the chassis.

-
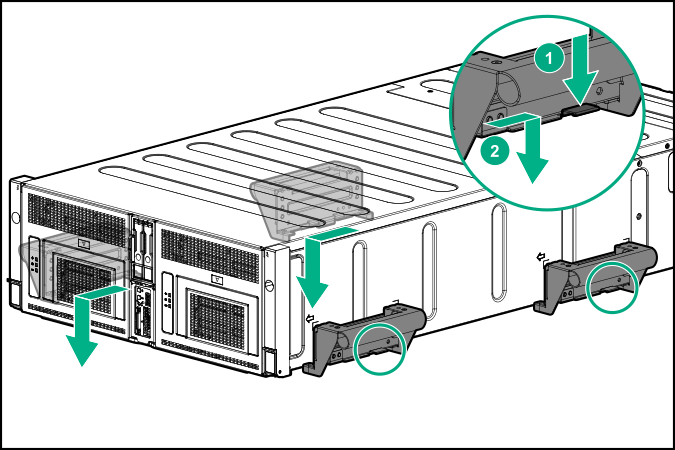
Remove the chassis lift handles when sliding the chassis onto the rails:
Remove the chassis lift handles from the chassis.
Do not remove the chassis handles until the weight of the chassis is resting on the rails. Retain the chassis handles for future use.
-
Align and install the chassis into the rack.
Slide the chassis into the rack until the ears are flush against the rack posts and secure the chassis to the rack.
