Setting up RAID using the Marvell BIOS Utility

Procedure
  1. Reboot the server.
  2. Access the MBU.
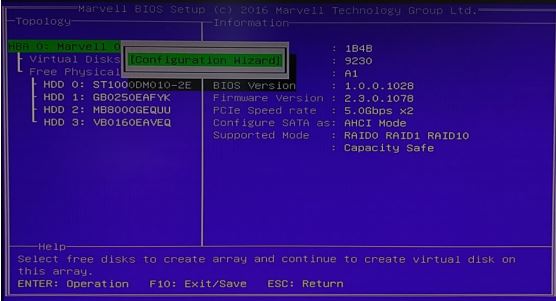
  3. In the Topology pane, select HBA 0: Marvell 0 and press the Enter key.

    The Configuration Wizard popup appears.

  4. Press the Enter key.
  5. Use the arrow keys to scroll through the list of free physical drives.
  6. To select/deselect the physical drive to use to create the drive array, press the spacebar.

    An asterisk (*) appears when a drive is selected.

  7. After selecting the physical drives, press the Enter key.
  8. Select the preferred RAID level and press the Enter key.
  9. Select the stripe size for the drive array and press the Enter key.
  10. A default name is assigned to the new drive array. To rename the drive array:
    1. Select the Name field.
    2. Enter a new name.
    3. Press the Enter key.
  11. Select Next.
  12. Press the Enter key.

    A dialog box appears to confirm the drive array creation.

  13. Press Y to create the drive array.

    The new drive array appears in the Topology pane.

  14. Press F10 to save the RAID configuration.
  15. If RAID was set up prior to the OS installation, install the OS now.