Installing a processor

IMPORTANT:

Existing HPE ProLiant and HPE Synergy Gen10 server products containing first-generation Intel Xeon Scalable processors may not be upgraded to second-generation Intel Xeon Scalable processors at this time.

For more information, see the product QuickSpecs on the Hewlett Packard Enterprise website (https://www.hpe.com/info/qs).

Hewlett Packard Enterprise recommends identifying the processor and heatsink assembly components before performing this procedure. For more information, see Processor, heatsink, and socket components.

Prerequisites

Before you perform this procedure, make sure that you have the following items available:

  • The components included with the hardware option kit

  • T-30 Torx screwdriver

  • T-10 Torx screwdriver

Procedure
  1. Observe the following alerts:
    CAUTION: When handling the heatsink, always hold it along the top and bottom of the fins. Holding it from the sides can damage the fins.
    CAUTION: To avoid damage to the processor or system board, only authorized personnel should attempt to replace or install the processor in this server.
    CAUTION: To prevent possible server malfunction and damage to the equipment, multiprocessor configurations must contain processors with the same part number.
    CAUTION: If installing a processor with a faster speed, update the system ROM before installing the processor.

    To download firmware and view installation instructions, see the Hewlett Packard Enterprise Support Center website.

    CAUTION: THE CONTACTS ARE VERY FRAGILE AND EASILY DAMAGED. To avoid damage to the socket or processor, do not touch the contacts.
  2. Power down the server.
  3. Remove all power:
    1. Disconnect each power cord from the power source.
    2. Disconnect each power cord from the server.
  4. Do one of the following:
  5. Remove the access panel (Removing the access panel).
    CAUTION: Do not operate the server for long periods with the access panel open or removed. Operating the server in this manner results in improper airflow and improper cooling that can lead to thermal damage.

  6. If installed, do the following:
    1. Remove the air baffle (Removing the air baffle).
    2. Remove the processor mezzanine tray (Removing the processor mezzanine tray).
    3. Remove the CPU Mezzanine UPI performance kit (Removing the CPU Mezzanine UPI performance kit).
      NOTE:

      Depending on the server configuration, your heatsink might appear different.

  7. Install the processor heatsink assembly:
    1. Locate the Pin 1 indicator on the processor carrier and the socket.
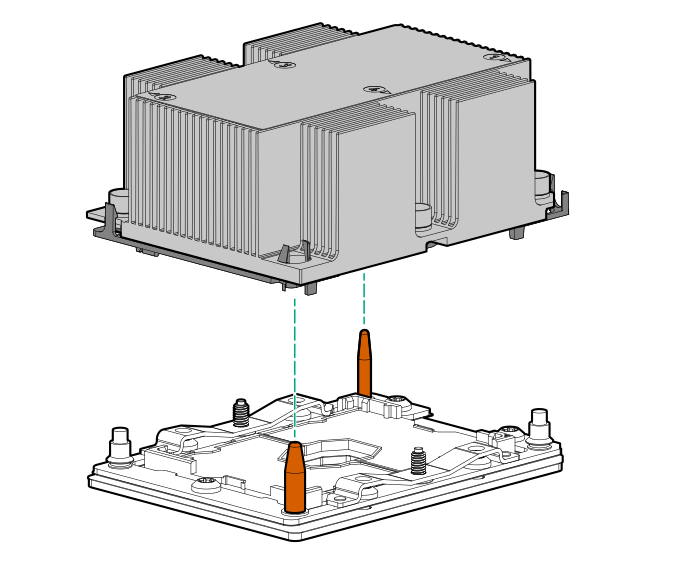
    2. Align the processor heatsink assembly with the heatsink alignment pins and gently lower it down until it sits evenly on the socket.
      The heatsink alignment pins are keyed. The processor heatsink assembly will only install one way.

      Your heatsink may look different than the one shown.


      Installing the processor heatsink assembly
      CAUTION: Be sure to tighten each heatsink nut fully in the order indicated. Otherwise, boot failure or intermittent shutdowns might occur.
    3. Using a T-30 Torx screwdriver, fully tighten each heatsink nuts in the order indicated on the heatsink label (1 -2 -3 -4) until it no longer turns.

      Tightening the heatsink nuts
  8. If removed, do the following:
    1. Install the air baffle (Installing the air baffle).
    2. Install the processor mezzanine tray (Installing a processor mezzanine tray).
    3. Install the CPU Mezzanine UPI performance kit (Installing a CPU Mezzanine UPI performance kit).
  9. Install the access panel (Installing the access panel).
  10. Install the server into the rack (Installing the server into the rack).
  11. Connect each power cord to the server.
  12. Connect each power cord to the power source.
  13. Power up the server.