Installing a processor-heatsink assembly
THE PINS ON THE SYSTEM BOARD ARE VERY FRAGILE AND EASILY DAMAGED. To avoid damage to the system board, do not touch the processor or the processor socket contacts.
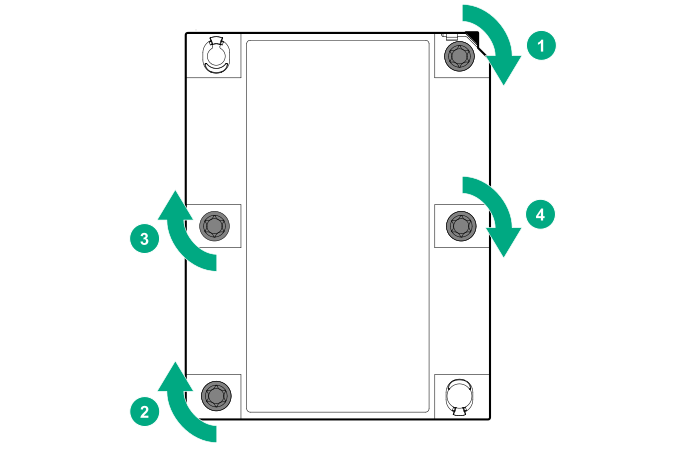
Heatsink screws must be tightened and loosened in sequence. Do not overtighten the screws as this can damage the system board, connectors, or screws.
To avoid damage to the processor and system board, only authorized personnel should attempt to replace or install the processor in this system.
To prevent possible system overheating, always populate each processor socket with a processor socket cover and a processor blank, or a processor and a heatsink.
To prevent possible system malfunction and damage to the equipment, multiprocessor configurations must contain processors with the same part number.
If installing a processor with a faster speed, update the system ROM before installing the processor.
Processor socket 1 must be populated at all times or the system does not function.
For optimum performance, Hewlett Packard Enterprise recommends:
Use DIMMs that match the speed of the processor installed in the system.
In a multiprocessor configuration, balance the total capacity of the DIMMs across the processors.
Existing HPE ProLiant and HPE Synergy Gen10 server products containing first-generation Intel Xeon Scalable processors may not be upgraded to second-generation Intel Xeon Scalable processors at this time.
For more information, see the product QuickSpecs on the Hewlett Packard Enterprise website (https://www.hpe.com/info/qs).
Processor or heatsink kit contents
T-30 Torx screwdriver
-
Install the processor heatsink assembly.
- Using a T-30 Torx screwdriver, fully tighten each heatsink nut in the order indicated on the heatsink label (1 -2 -3 -4) until it no longer turns.
- If you are installing the processor-heatsink to socket 2 to install an expansion board in PCIe slots 5, 6, or 7, remove the air blocker for those slots (Remove the air blocker from PCIe expansion slots 5–7).
- Using a T-30 Torx screwdriver, fully tighten each heatsink nut in the order indicated on the heatsink label (1 -2 -3 -4) until it no longer turns.