Prerequisites
Before you perform this procedure, make sure that you have the following items available:
Before you perform this procedure, perform the following steps:
Back up data on the system.
Close all applications.
Update the server firmware if it is not the latest revision.
Do one of the following:
If the new Smart Array is the new boot device, install the device drivers.
If the new Smart Array is not the new boot device, go to the next step.
Ensure that users are logged off and that all tasks are completed on the server.
CAUTION: In systems that use external data storage, be sure that the server is the first unit to be powered down and the last to be powered back up. Taking this precaution ensures that the system does not erroneously mark the drives as failed when the server is powered up.
Procedure
-
Remove the front bezel.
-
Power down the server.
-
Remove all power:
- Disconnect each power cord from the power source.
- Disconnect each power cord from the
server.
-
Disconnect all peripheral cables from the server.
-
Do one of the following:
-
Remove the access panel.
-
Remove the air baffle.
-
If installed,
remove the fan cage.
-
Remove the PCI blank retainer.
-
Identify the expansion slot compatible with the option.
-
Remove the PCI slot blank.
-
If the storage controller option does not include a screw for installation,
remove one of the preinstalled PCI board screw.
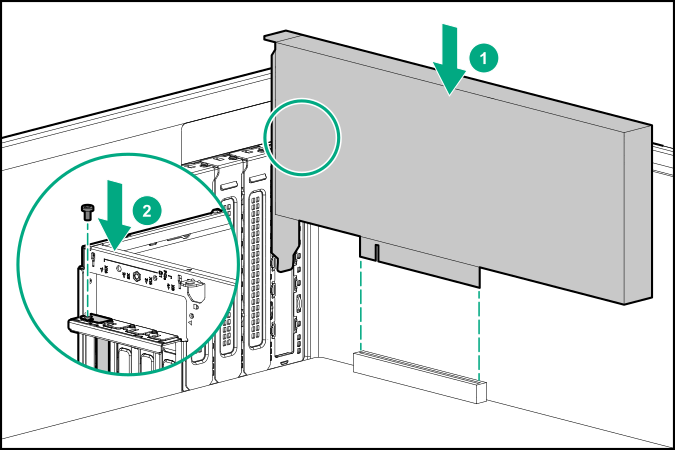
-
Install the standup storage controller.
-
Make sure that the board is firmly seated in the slot.
-
Install the PCI blank retainer.
-
Observe the guidelines for managing cables.
-
Cable the controller.
-
To enable HPE Smart Array SR SmartCache or HPE Smart Array MR CacheCade in a Smart Array P-class type-p Gen10 controller,
install an energy pack.
SmartCache and CacheCade enable solid-state drives to be used as caching devices for hard drive media. These features accelerate access to frequently used data by caching hot data from the hard drives onto the solid-state drives.
-
If the fan cage was removed, do the following:
- Make sure that all the system cables that are routed through the front cable channel are properly secured in the metal cable tabs. This is done to prevent system damage due to cables being inadvertently caught under the fan cage.
- Install the fan cage.
-
Install the air baffle.
-
Install the access panel.
-
Do one of the following:
-
Connect all peripheral cables to the server.
-
Connect each power cord to the server.
-
Connect each power cord to the power source.
-
Install the front bezel.
-
Configure the storage controller.
The installation is complete.