Prerequisites
Before you perform this procedure, make sure that you have the following items available:
Before you perform this procedure, perform the following steps:
Back up data on the system.
Close all applications.
Update the server firmware if it is not the latest revision.
Do one of the following:
If the new Smart Array is the new boot device, install the device drivers.
If the new Smart Array is not the new boot device, go to the next step.
Ensure that users are logged off and that all tasks are completed on the server.
CAUTION: In systems that use external data storage, be sure that the server is the first unit to be powered down and the last to be powered back up. Taking this precaution ensures that the system does not erroneously mark the drives as failed when the server is powered up.
Procedure
-
Remove the front bezel.
-
Power down the server.
-
Remove all power:
- Disconnect each power cord from the power source.
- Disconnect each power cord from the
server.
-
Disconnect all peripheral cables from the server.
-
Do one of the following:
-
Remove the access panel.
-
Remove the air baffle.
-
If installed,
remove the fan cage.
-
If a server that has both a modular storage controller and a double-width GPU present in the PCIe slot 5 or 7 is going to be transported to a different location,
install the AROC cover and cushion included the AROC cable kit.
-
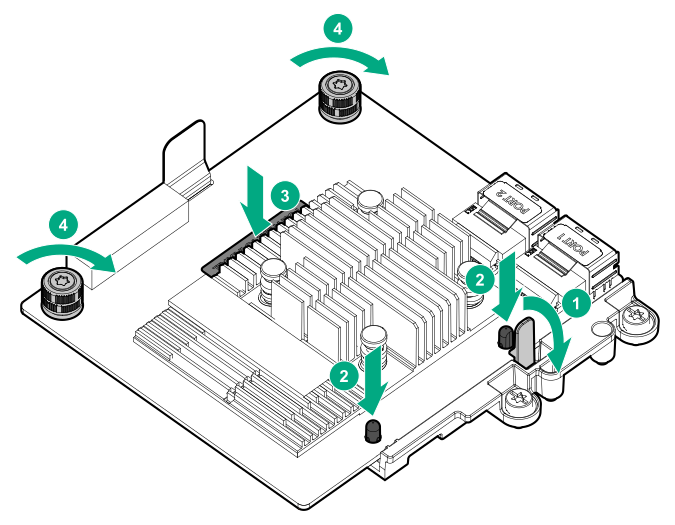
Install the modular storage controller:
- While holding the snap-in latch in the open position, insert the alignment pins on the system board through the holes on the controller board.
- Release the snap-in latch and make sure that it properly engages over the side of the controller board.
- Press on the area of the controller board marked as
PRESS TO INSTALL to ensure that the board is firmly seated on the slot.
- Tighten the controller board thumbscrews.
-
Observe the guidelines for managing cables.
-
Cable the controller.
-
If the fan cage was removed, do the following:
- Make sure that all the system cables that are routed through the front cable channel are properly secured in the metal cable tabs. This is done to prevent system damage due to cables being inadvertently caught under the fan cage.
- Install the fan cage.
-
Install the air baffle.
-
Install the access panel.
-
Do one of the following:
-
Connect all peripheral cables to the server.
-
Connect each power cord to the server.
-
Connect each power cord to the power source.
-
Install the front bezel.
-
Configure the storage controller.
The installation is complete.
