Network Storage
Estimated reading time: 5 minutes
OT Link Platform allows you to mount network storage through the System > External Storage page. This enables you to share the same storage location with all marketplace applications. Network storage expands the storage pool and facilitates enterprise backup/restore processes.
Follow the steps in the following sections to configure external storage:
Prerequisites:
- Set up a remote storage location. This page describes how to do this on Windows and Linux machines.
- Admin/root permissions to create shared folders.
Make a Shared Folder
Install Samba for Linux
This Linux example describes how to install Samba and make a shared folder for remote storage on OT Link Platform.
To make a shared folder on Linux:
-
Open the Terminal. Enter the following commands to install Samba:
sudo apt-get update sudo apt-get install samba -
Enter the following command to create a password for your Samba user:
sudo smbpasswd -a <user_name> -
Enter the following command to make the shared folder:
mkdir /home/<user_name>/<shared_folder_name> -
Enter the following commands to make a backup copy of the smb.conf file before editing it.
sudo cp /etc/samba/smb.conf ~ sudo nano /etc/samba/smb.conf -
Add following lines to the end of
smb.confto allow reading and writing to the shared folder:[<folder_name>] path = /home/<user_name>/<shared_folder_name> valid users = <user_name> read only = no -
Enter the following commands to apply the changes to smb.conf by restarting Samba and checking the file for syntax errors:
sudo service smbd restart
testparm
Configure Windows 10 CIFS
This example describes how to make a folder on Windows 10 for remote storage on OT Link Platform.
To make a shared folder on Windows 10:
- On Windows 10, log in as a user with admin permissions and create a new folder. This example uses
C:\SharedFolder. -
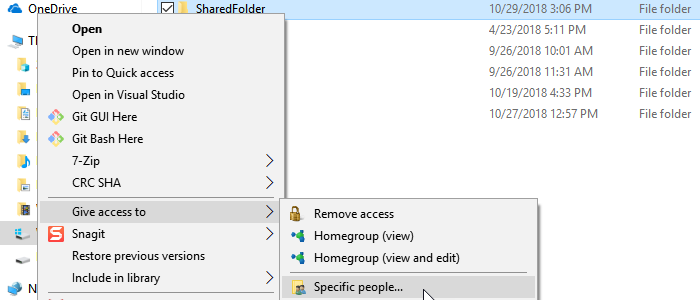
In File Explorer, right click on the folder and select: Give access to > Specific people…
-
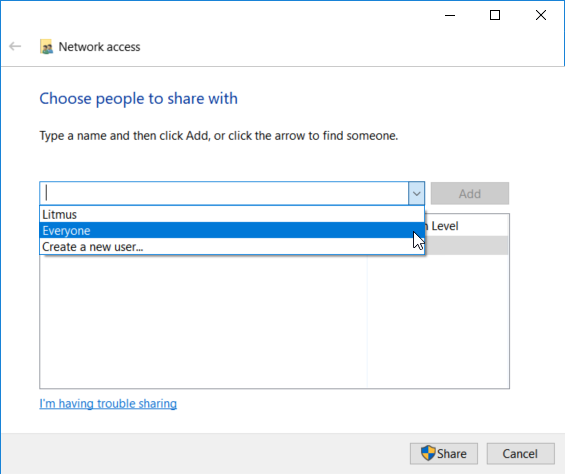
Use the drop-down menu to share the folder with Everyone. Click Share.
-
To check if the folder is shared properly, open File Explorer and type _\localhost _into the top bar. The folder will appear if it is setup correctly.


Troubleshoot Windows 10 CIFS
If you are having issues with the previous steps for Windows 10, try making sure that you have SMB 1.0/ CIFS File Sharing support enabled in the Windows Features settings.
Activate SMB 1.0/CIFS for Windows 10:
Windows 10 does not have SMB 1.0 / CIFS enabled by default.
To activate SMB 1.0 / CIFS on Windows 10:
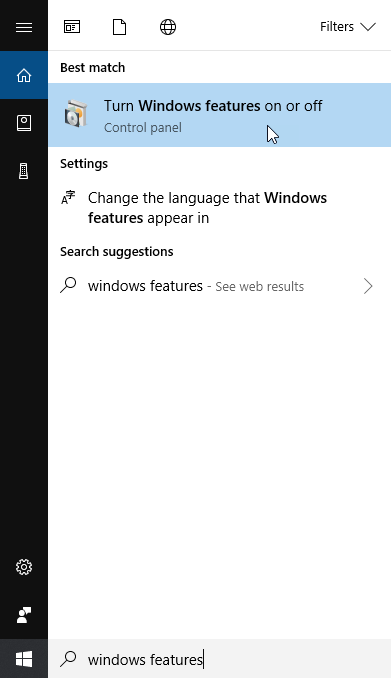
- Search Windows Features in the Windows 10 search bar.
- Click Turn Windows features on or off.
-
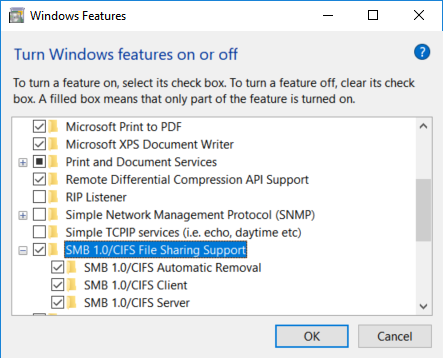
Click the SMB 1.0/CIFS File Sharing Support checkbox to activate all of the CIFS services on Windows 10. Click OK.
Configure the Network Path
If accessing the folder from OT Link Platform, or elsewhere on the network, make sure that you use the full network path of the shared folder. You can find this information in folder properties and configure a custom network path with Advanced Sharing.
Configuring the network path manually makes it easy to have a shared folder be stored anywhere on Windows 10. If you want your shared folder on the Desktop, for example, it is best to set a custom network path so it is easier to remember.
To View and Configure a Shared Folder Network Path On Windows 10:
-
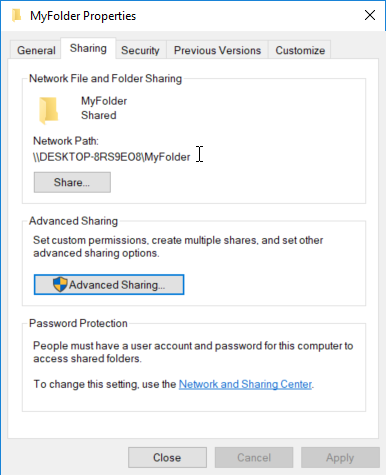
Start with a shared folder, this example uses MyFolder, on the Desktop in Windows 10. Right-click the folder, then click Properties.Here you will see the full network path for if you want to access the shared folder through the network.

Make sure to share the folder with the Share button, if you have not already done so. See Configure Windows 10 CIFS for more details about this.
-
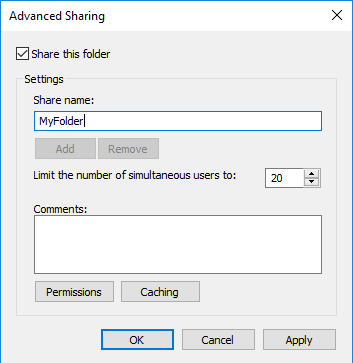
Click Advanced Sharing to set a custom network path. Make sure to check Share this folder if it is not already checked. Click Apply, then click OK.
-
You will see the updated network path in the folder properties. It should be much shorter and more usable.
Mount Network Storage in OT Link Platform
To mount shared external storage in OT Link Platform:
- In the Navigation Panel, go to System > External Storage.
- Click
 to create a new Mount Point.
 -
Enter your network storage information, as described in the following details. Click Save.
Field Details:
Mount Point Name - Enter any alphanumeric name. The system will automatically create the folder in /data/ on the OT Link Platform device.
Type - The type of filesystem for the remote storage
Share - Enter the URI of your remote storage location, typically _//
/ _ if you manually configured the shared folder network path. Read Only - Check to disable writing to the network storage.
Mount on Boot - Check to mount the remote storage whenever you boot the OT Link Platform device.
Username - Enter the user name for the network location. Typically, the Windows username or the Linux Samba username.
Password - Enter the password for the network location. Typically, the password for the Windows username or the Linux Samba username.
Domain - This information is not necessary to connect in most cases. It is the name of the machine where the network folder resides. Type
hostnamein the Windows command line or Linux terminal to view this information.
To find your systems IP address. Type
cmdinto the Windows search bar. Typeipconfiginto the window and use IPv4 address for your Ethernet or wireless adapter. -
Click the Actions icon to view options for your new mount point.
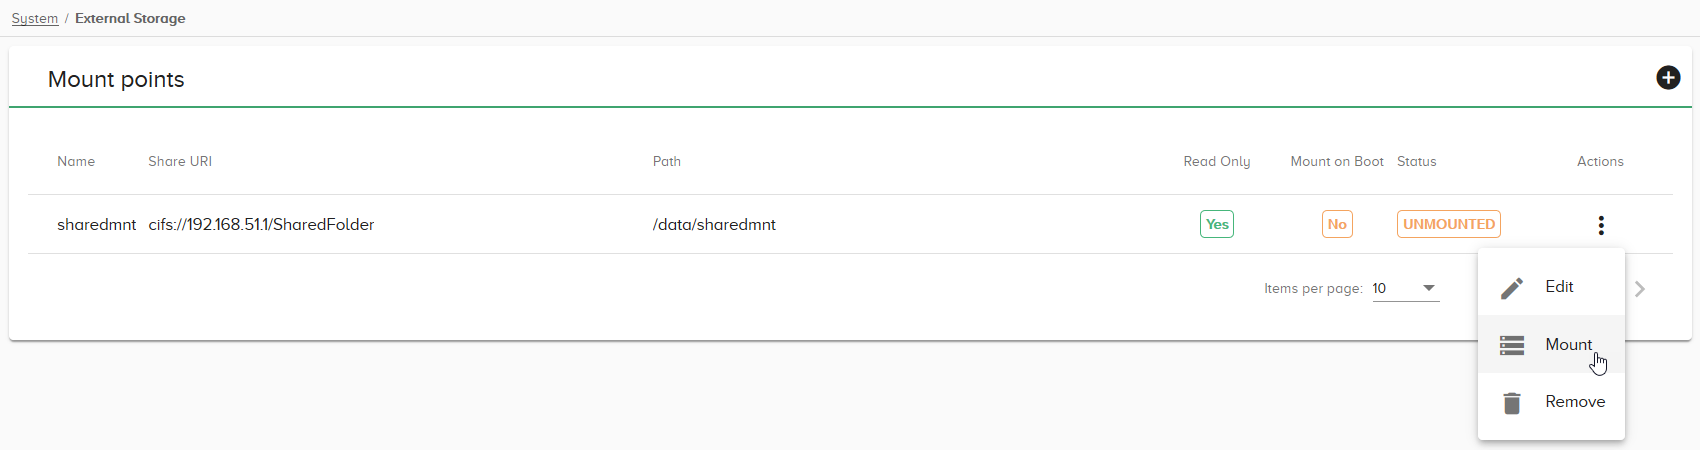
- Click Mount to finish mounting the storage.